Showing posts with label recipe. Show all posts

Monday, March 17, 2014

An Elephant Never Forgets...until it does


I used to make a prawn salad, all the time. It was an almost weekly summer go-to recipe. Prawns marinated in olive oil, sumac, garlic, herbs and more, fried in a hot pan with a splash of white wine to cook down into a dressing for a yummy salad of baby spinach leaves, avocado, tomatoes, chickpeas and I forget the rest but gee it was tasty. I always thought I would remember that recipe given I made it so often.

And then we moved to Canberra and I didn't make it as often, actually at all, for whatever reason. And then I forgot how to make it. I was completely blank when I went to make it this summer. Damn.


I don't want to be in the same position with my Nutty Brown Rice Salad; that's it above. It's my current go to. A regular one of my minimum three salads for a BBQ (yes, a minimum of three salads at any BBQ at my place). A regular on our summer dinner table - often with meatballs, fresh tomato, sliced spanish onion and hummus in wraps. So, here's my best attempt at helping an elephant to never forget....


Nutty Brown Rice Salad

I think the secret of this brown rice salad is the flavour the rice gets from cooking in the stock and all the garlic. I use homemade chicken stock for most things but I keep a tin of (insert brand name) low-salt imitation chicken stock (what's that you say? Chicken stock for hipsters ?) just for this.

1 1/2 cups brown rice (I don't actually measure this, I just pour it into the saucepan but I think this amount is about right for the rest of the ingredients)
1 big heaped Tbsp powdered stock
3 garlic cloves, peeled plus 1 extra crushed or finely chopped
2 Tbsp olive oil
1 medium brown onion, diced
2 Tbsp pine nuts
2 Tbsp slivered almonds
2 Tbsp pepitas
2 Tbsp sunflower seeds
chickpeas - about 3/4 tin (I use chickpeas I've soaked, boiled and frozen - about a small ziplock bag full)
salt and pepper to taste and an extra glug of olive oil
chopped fresh parsley

Put the rice into a saucepan with the stock powder and 3 peeled garlic cloves, cover generously with cold water. Bring to the boil and simmer rice until cooked.

While the rice is cooking, heat a medium sized frypan (one that will fit all the rice in it) over a low to medium heat. Add the oil and onions, a dash of sea salt, pine nuts, almonds, pepitas and sunflower seeds and cook until the onions are soft and starting to turn a bit brown and crispy and the seeds and nuts are looking toasty.

Add the extra garlic clove and cook just a little bit more to soften.

By now the rice should be cooked (be careful not to over cook it). Drain well and add to the onion/nut/seed mix along with the chickpeas. Keep the garlic cloves that were boiled with the rice in there too, just use your wooden spoon to mash them down a bit and mix them in well.

Add a gluc of olive oil, parsley, salt and cracked pepper to taste and mix well.

You can serve it hot but I prefer it cold. Would be pretty good alongside some falafel.


Now it's turning cool enough to get the knitting needles out, I have plenty of time to experiment to get that prawn salad recipe back, ready for next summer.



Friday, June 10, 2011

Falafel – If you love them, this recipe will change your (falafel eating) life


Bold statement I know, but let me explain. 

Falafel are yummy. Having once been vegetarian for about 10 years, I feel qualified. I still favour falafel over a shawarma (lamb kebab), even though I am back to eating meat now. So, as a falafel lover, I have been making them for years but I could never get that delicious crisp outside with light fluffy insides – you know what I mean.

I’ve tried all the same recipes you have. On all those websites, in all my (many) cookbooks and food magazines, from blogs and the tried and tested ones scribbled on paper. Most of them were fine, but none of them were perfect or close to authentic and not one of them used (what I now know to be) the proper method. 

The main problem was that, without fail, they fall apart in the pan. So then of course I would add egg and rice flour to bind the mix – which in turn makes them hard, dry and yuck. Every.single.time.

Then last year after searching for some authentic recipes and chatting with a Lebanese friend,  I found the answer. I didn’t believe it at first. Soaked, and not cooked, chickpeas. NEVER tinned. The not boiled bit was what threw me, but who am I to argue with hundreds (thousands?) of years of cooking falafel? (Incidentally I stupidly did try and defy those many generations of experience by using boiled peas on my first attempt at this method. GUARANTEED FAILURE, but by all means do feel free to try it out yourself.)

So, believe me (and the many, many middle-eastern families who’ve been doing it this way for generations) it works. You can thank me later for all the testing and practising I’ve done for you. Why didn’t I go down this path earlier?

Before I share the recipe I use, here are some tips I’ve picked up along the way through trial and error.
  • Soak your beans for a LONG time. At least 24 hours – or they will not hold together. Just put them in a bowl, cover with water and ignore them on the bench for a day or two. Sometimes I even leave them for two nights. But replace your water once or twice if you remember. 
  • You can use just chickpeas or broad beans or a combination of both.  You will need to shell the broad beans though (after they are soaked).
  •  You will need to scrape down the sides of your food processor when you blitz them. Probably a couple of times. Persist with it, if it’s not blitzed well it won’t cook well.
  • Make a double batch and freeze half of the made up mix. Revelation I tell you! Works perfectly. Just defrost, roll into balls and fry. Falafel whenever you feel like it.
  • You can buy dried pulses from the supermarket, but I prefer to get mine from the market. Buying in bulk is fine, they keep for ages. I also boil up a big batch (not for falafel, of course!) then freeze with a bit of the boiling water in small containers or ziplock bags. Cheaper and much yummier than tinned chickpeas and with less salt.  Also, a good way to afford organic. 
  • You can shallow pan fry the falafels in oil if you prefer not to deep fry them.
  • If you’re new to deep frying, you can use a small saucepan to deep fry in batches so that you don’t need to use as much oil. Just make sure your saucepan edge is high enough so the oil won’t overflow when you put your felafel in to fry. Fill the saucepan with oil about 5cm high and make sure you turn your felafels during cooking to brown all sides.
  • Add some sesame seeds to the mix. 
And now the recipe. You will find most authentic falafel recipes are pretty much like this. Some use more garlic, some ask for baking powder instead of bicarb soda, whatever the slight tweaks, the soak - blitz with flavour -fry method remains the same.


INGREDIENTS:
1 cup dried chickpeas (DON'T shortcut with tinned or boiled it will not work)
1 cup dried broad beans (as above cannot be stressed enough!)
1 small red onion finely chopped
2 garlic cloves, chopped
¼ cup chopped flat leaf parsley (can add or substitute with fresh coriander)
1 tsp bicarb soda
1 1/2 tsp salt flakes (less if using table salt)
1 tsp ground cumin
1 tsp paprika
Water (a couple of Tbsp)
Oil for frying

METHOD
Soak the chickpeas and broad beans for at least 24 hours. Shell the broad beans when they are soft enough to pop out of the shells. Do NOT use tinned or boiled beans, they must be dried and soaked.

Drain the beans and rinse.

Place all ingredients, except the water and oil, in the food processor. Pulse the mixture until it is gritty, but fine.

You will need to scrape the sides of your bowl a few times. Add the water to help the mixture along. You might need lots, you might need a little – it depends on the mixture. Give the mix one last blitz for good measure.

Heat deep fryer (or oil in the pan). Throw in a parsley leaf to test it. It should sizzle well, but not too vigorously. (If the oil isn’t hot enough your felafel will be oily, but if it’s too hot the outside will cook before the middle).

Roll balls (not too big 1 – 2 Tbsp of mix) of falafel mix and carefully drop into the hot oil. Fry until brown and crisp all over.

Drain on paper towels and serve hot.


Download recipe with tips here. 

Sunday, October 17, 2010

Chilli Jam - Make This Please


This is not the first time I've talked about Chilli Jam here. But you see it is the stuff of magic making in your mouth. So good that I have contemplated eating it from the jar the way some of you eat nutella. This chilli jam is what started the friendship I talked about in my post on Whip Up.

After a discussion about 20kgs of tomatoes and a school fete on twitter I'm offering the recipe up for one and all. This is the chilli jam my Dad makes (always with an assortment of homegrown chillis). He has many bastardised versions he makes, but this is the recipe that started it all.


Chilli Jam
- 2 kg ripe tomatoes
- 150ml olive oil
- chillis - depends on how hot you like it really. I use 4-5 habenero or 10 medium - long red chillis. You can also deseed some of the chillis if you want. It's really up to you
- 20 garlic cloves, peeled and chopped
- 50g piece of fressh ginger peeled and chopped
- 2 tbsp cummin
- 2 tbsp brown mustard seeds (I often leave these out if they're not in the pantry)
- 1 tbsp tumeric
- 50ml fish sauce
- 200 ml red wine vinnegar
- 200g brown sugar
Optional: 2 red capsicums )or more if you want)


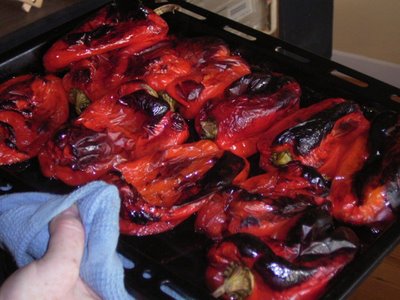
- Put the tomaotes (and capsicums if you're using them) on a baking tray and drizzle with some extra olive oil. Roast in a moderate to hot oven for 20 minutes until the skins start to blister and split.

- While the tomatoes are in the oven, in a food processor combine the chilli, garlic, ginger, cumin, mustard seeds, tumeric, fish sauce, red wine vinegar, brown sugar and olive oil.

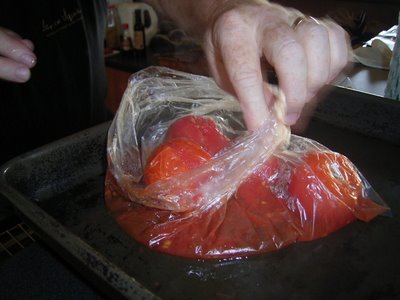
- When the tomatoes are ready use tongs to peel the skins off (you should be able to grab the skin and most of it will come away). Or put in a plastic bag and the tomatoes will sweat a little making it easier to remove the skins. Same with the capsicum. Watch out for your fingers in this step the tomatoes are hot.


- Put the tomatoes (and capsicums) and combined chilli mix into a heavy based saucepan. Add salt and pepper to taste.

- Bring to the boil then reduce to a very low simmer and cook for 1 1/2 - 2 hours, stirring frequently to make sure the jam doesn't catch.

- While the jam is boiling sterlise your jars.

-When the chilli jam is ready, ladle the hot jam into a pouring jug and use this to pour the jam into hot sterlised jars (always hot jam into hot jars). Put the lids on.

- Allow to cool.

This jam is great on sandwhiches, seriously good under melted cheese on toast and amazing with corn fritters. Also try it with really nice fresh bread and cream cheese. A jar doesn't last long in our house.

Saturday, October 09, 2010

Meringues, but not as you know it


Thanks for all the birthday wishes for the resident three year old Smurf. He has already requested another birthday. I told him he could have one next year.

One of the hits of the make your own lolly bags was the meringue rings. Inspired by what I now know to be a piece of jewellery (I have no idea where I originally saw it, but I bookmarked the photo and now I've googled the image and realised it was jewellery!)


So, armed with the piping bag I piped out a bunch. It's quite simple really. Pipe the circle for the ring - thinking about the size of the intended finger - and then pipe a star on the edge of the circle. Gently sprinkle sprinkles on the star. Bake as per normal meringues.

The kids went straight for them after the pink cake candles were blown out. They fit perfectly on little fingers and were nibbled straight off.


I had loads of meringue - even after a batch of actual meringues and meringue rings so I started to have a play around. I switched to my thinnest piping nozzle and started to pipe the kids names. I got happy with the sprinkles and baked them alongside the rest of the sugary eggwhite.


They turned out fab. But in my haste to admire them I cracked each and every one of them as I lifted them off the tray. So, if you try these, here are some tips:

- Err on the side of thicker when piping
- Look out for skinny parts of letters (see beginning of the 'm' in Sam below)
- Make sure you leave them to completely cool on the tray
- Use a flat spatula to very carefully slide them off the tray.


Also, only invite kids with short names to your party - less risk of breakage with less letters.

Thursday, March 18, 2010

Toddler Distracting 101 - Freckles


Here, my friends, lies the secret to distracting a toddler - homemade Freckles. It's a winner two times over - the making and the eating. But you've all done this one before, haven't you.

Step 1:


Melt some chocolate. There's no science to this, if you melt more chocolate you get more freckles. Feel free to use some expensive couverture chocolate if your toddler appreciates the finer things in life.

Step 2:


Spoon the melted chocolate on a tray lined with baking paper. If you're brave, let the toddler do it. If you're a little more on the anal side, let the toddler watch and then start on the next step while you keep dolloping chocolate on the tray.

Step 3:


Toddler's turn. Let them loose with a spoon and a little bowl of sprinkles. They can sprinkle until their heart's content.

Leave them on the tray to set - or put them in the fridge if the toddler you're impatient.

Step 4:


Eat and enjoy the peace, or use for bribes as required, whatever you need to get you through the day.

Wednesday, August 26, 2009

Biccie Boys


Apparently Gingerbread Men are now called Biccie Boys, well according to the Smurf. It was all I could do to keep a straight face when he shouted with delight "biccie boy" when handed a gingerbread man last week.

So, should you want to join in the biccie boy joy....

Honey Biccie Boys
125g butter, softened
1/2 cup caster sugar
1 egg
1/2 cup honey
1 tsp vanilla extract
2 1/2 cups plain flour
1 tsp baking powder

Preheat oven to 190 degrees

Using an electric mixer (or strong arm muscles and a wooden spoon) beat butter and sugar until light and creamy.

Add honey and vanilla and beat well.

Add egg and beat well.

Add flour and baking powder and mix with a wooden spoon until well combined. Gently knead the dough until smooth.

Wrap the dough with plastic wrap and rest in the fridge for half an hour. At this point you can freeze half the dough for later if you want.

Once dough has rested, roll it out between two sheets of baking paper to about 5mm thick. Use your biccie boy cutter to cut your biscuits and place on a baking tray lined with baking paper.

Bake in the oven for 10 - 15 minutes, or until lightly golden.

Share your Biccie Boys with your friends!

Sunday, December 21, 2008

It's beginning to look a bit more like Christmas


The oven has been going - well technically the microwave too. First up, Melting Moments and Chocolate Fudge for the Smurfs' Child Care teachers. Big hit it was, I dropped off that box above with the Smurf on Friday morning and by the time I picked him up the entire batch of fudge was consumed. I thought it might get lost amongst the boxes of Lindt chocolate and Ferrero Rochers parading through the door, so I was chuffed to hear it was consumed with gay abandon!

Oops I forgot to take photos between the baking/making and packaging so instead, here's the dregs which formed my afternoon tea.


I'll make up for it by giving you the secret easiest ever fudge recipe - kinda like the Chocolate Slice but, even easier, promise!

2 x 250gm blocks of Cadbury chocolate
1 x 400g-ish tin sweetened condensed milk
1 tsp vanilla extract

- Line a slice tin with baking paper
- Melt the chocolate in the microwave
- Add the condensed milk and vanilla
- Stir like crazy till it's all combined (this will get a bit tough because it's not cooking chocolate, but don't fret too much about perfection here) I'm happy to sacrifice appearance for deliciousness.
- Pour into the tin, spread it out the best you can and put in the fridge to set
- Cut into squares and try not to eat too much before you give it away.

See, seriously easy and this will be a hit everywhere for you forever more I double promise. Now just don't tell anyone your new secret! And please don't bring it to my house when I invite you over for a BBQ cause I will already have made it to impress you.

Now I'm off back to The Toy Society to keep posting those 100+ toy drops that happened for this weekend's World Wide Christmas Toy Drop. I'm so inspired by all the people involved!

Saturday, November 15, 2008

For the Trashbags


Trashdip! So named not because I'm a trashbag (although maybe I am) but because back-in-the-day we used to eat this a lot and sometimes if too many beers were drunk it was considered to be dinner. Trash dinner. Trashbags. Um... join me?

Trash dip.

What you need:
1 avocado
1 lime (can use a lemon instead if you prefer)
salt, pepper
300ml tub of sour cream (doesn't matter if it's a bit smaller)
1 packet low salt taco seasoning (it's the powdered stuff)
1 tsp olive oil
1 tin chickpeas
1 tin kidney beans
1 tin peeled tomatoes
1 onion chopped roughly
1 clove garlic crushed
1 tomato finely diced
3 shallots (green onions) finely sliced
3/4 cup grated tasty cheese
chopped fresh (flat leaf) parsley
something for dipping - corn chips, water crackers are my recommendations

What you do with it:
That list of ingredients up there sounds long and complex, but really it's all very easy.

1. Make up the beans in advance as they need time to cool. The night before you want to eat trash dip is helpful. Fry the onions in the olive oil until soft, add the garlic and drained chickpeas and kidney beans and heat through. Now add about 1 tbsp of your taco seasoning and the tin of peeled tomatoes, some cracked pepper and salt to taste. Mix it all up and add a bit of water if it looks too thick. Cook this down a while until it's thickened. It doesn't need long, 5-10 minutes maybe? Leave to cool and then put into the fridge until you need it.

2. Make the sour cream layer. Mix your tub of sour cream and 1tbs of the taco seasoning. Taste it and keep adding as much taco seasoning as needed until it tastes yummy and taco-ey but not too over powering. Just so you know I usually get at least 2 trash dips total out of 1 packet of seasoning. Put this in the fridge to set before assembling the dip.

3. Make your guacamole layer. Mash the avocado with the juice of half a lime and salt and pepper. Add more seasoning or lime if needed. If you need to store the guacamole for a couple of hours or over night before serving, best to add extra lime juice.

4. Now, time to assemble your masterpiece. Best to work with all the dip layers cold from the fridge. Spread the beans across a platter or dinner plate. Spoon the guacamole on top of the beans


and gently spread it out almost to the edge of the beans but leave some beans to be seen. It's dip art, darlink.

Now do the same with the sour cream layer.


Sprinkle the grated cheese over the top, then the tomato, then the shallots and finally scatter the parsley.

Now eat the dip, you Trashbag.


PS A final word on the ingredients. This is trash dip and, really, if you're going to do this dip you need to do it justice and for that I really must insist that you use full fat ingredients. Watery, low-fat sour cream just does not cut it here. I will allow you to use low fat grated cheese if you really must, but you'll only be considered a half-arsed trashbag OK.

Thursday, September 11, 2008

Chocolate Slice gets a taste lift


I've been tinkering with the chocolate slice recipe.

I thought I'd try and make it a bit healthier with some wholemeal flour. It worked. I thought I'd take a bit of butter out to see if that would be OK. It worked. I then completely ruined it all when I saw the half used pack of white choc buttons in the pantry and thought I could use some of those up. It TOTALLY works!

Now, this does make a dryer slice, so you may like to use the original amount of butter (185g) - especially with the wholemeal flour. But please, please please whatever you do you must try the addition of white choc buttons, with either version of the recipe.

Sadieandlance's easy double chocolate slice:
1 cup wholemeal plain flour
1/2 cup sugar (caster is best)
1 cup desicated coconut
1/2 -2/3 cups of white chocolate buttons (to your taste)
1 tbsp cocoa
125g butter
1 tsp vanilla

Icing:
1 cup icing sugar
2 tbsp cocoa
30gms butter
1 1/2 tbsp hot water

- Preheat oven to 180 deg celcius
- Mix all the dry ingredients together
- melt butter and add vanilla
- Mix wet and dry ingredients together
- Press into a slice tin lined with baking paper
- Bake in oven for 20 mins - it won't look that different when you get it out of the oven but it is cooked!
- leave to cool in tin
- meanwhile make the icing - just mix it all together.
- Ice the cooled slice and sprinkle with a little bit more of the desicated coconut, or as someone (I've looked everywhere to see who but can't find it) pointed out sprinkles work equally well here.
- cut into small squares and eat, eat, eat the slice.

PS Very good with icecream should you like to be a complete piggy and consume some as desert. (Edited to add: Sorry or you could even enjoy it as dessert. Consuming as an expanse of sand doesn't make any sense).

Wednesday, May 28, 2008

Stuff your Face

So, it seems like you kids are more of the food types than the music types...still I'm keen to hear more favourite songs so I'll give you till 10pm next Tuesday (Aussie time) to let me know. Tell your friends too cause I'm really enjoying seeing what makes you belt it out at the top of your lungs!

Back to the food thing, lets put you to the taste test, are you sweet or savoury? My guess is sweet judging by all the awesome comments you left on the Chocolate Slice post - peeps I'd never even heard of before stopped by for some indulgence. Sweet. Anyway, I was wondering if you might like to taste some of this roasted veggie salad?


It's my current fav. I've made it twice this week alone. It's different every time I make it, but if you want to try it, you'll need some of this (suggested quantities but use what you like in whatever quantities):

Sweet Potato (1 small)
Pumpkin (1 small piece)
Potatoes (4 medium size)
Red Onion (1)
Carrots (2 bigg-ish ones)
Zucchini (2 medium size)
Eggplant (1 small or 2 Japanese/finger sized ones)
Cob if fresh corn
Garlic cloves (to your taste, but I add about half a bulb)
hot paprika (wuss bags can use mild)
sumac
dried oregano
pepper
Baby Spinach (or Baby rocket)
Pinenuts, toasted
Parmasen cheese (shave it off the block)
olive oil
balsamic vinegar
sea salt flakes (or whatever salt you like to use)

- Preheat the oven to about 200 deg celcius, put your baking tray in the oven while it's pre-heating too
- I start with the hardest cause I like them to be almost caramelised by the time I eat this salad. So, start with carrots and the onion. Cut the carrots in small chunks - I do this by cutting the carrot in three or 4 sections, then cut each section in half long ways, then in half again longways - kinda like wedges. But shit I don't need to tell you how to cut up a carrot, do it how you like, I'm just anal about how I cut MY carrots.
- Now do the onions too - in wedges please.
- Put them in a bowl with a splash of olive oil and a shake of each of the herbs and spices (about 1/2 - 1 teaspoon of each and a good twist of cracked pepper - but all to your taste really). Mix mix mix till it's nice and coated.
- Bung this in a hot baking tray and shove it in the oven.
- While that's cooking chop up the potato, pumpkin, sweet potato, garlic cloves, add it to the bowl (no need to clean between lots) and add some more of the olive oil, herbs and spices. PS I don't bother to peel the carrots or potatoes if they're not the dirty buggers.
- When the carrot and onion is well on its' way, add the potato mix to the pan and keep baking
- While that's cooking chop up the zucchini (same way as the carrot), eggplant and cut the corn kernals from the cob (or cut the cob in thin slices) and mix in the bowl - no need to add more herbs n spices this time.
- Add the zucchini mix to the baking dish when the potatoes are well on their way.
- Keep the veggies cooking until it's all nice and roasted. I like it when the zucchini and eggplant has cooked well and has shrunk - but whatever floats your boat.
- While the veggies are cooking, toss the baby spinach with olive oil, balsamic vinegar, salt pepper and shaved parmasen.
- When the veggies are all cooked to your liking, toss the veggies through the spinach salad and top with the pinenuts.

What I love about this salad is it's a total veggie overload. It's really pretty easy if you're not too afraid of some chopping time and you can adapt it (please do) to include any veggies that you need to use up (well maybe not celery but you get the drift). This isn't rocket science here people, obviously I'm not the first person to make roast veggie salad but I heart this combo of spices and that makes it for me.

This salad is good enough to eat as is, but goes well with anything really. Like I said we've eaten it twice this week, once with quiche (or eggpie for the blokes) and once with these delicious corn fritters.

Sunday, April 20, 2008

Step away from the computer

And make yourself some chocolate slice.


It only takes the shortest time, it tastes delish and even if you don't like chocolate that much you'll enjoy this slice. Trust me you will only have to step away from the information super highway for about 5 mins to make it (10 max if you count the time taken to remove ingredients from the cupboard).

Easy Chocolate Slice
1 cup plain flour
1/2 cup sugar (caster is best)
1 cup desicated coconut
1 tbsp cocoa
185gms butter
1 tsp vanilla

Icing:
1 cup icing sugar
2 tbsp cocoa
30gms butter
1 1/2 tbsp hot water

Slice:
- Preheat oven to 180 deg celcius
- Mix all the dry ingredients together
- melt butter and add vanilla
- Mix wet and dry ingredients together
- Press into a slice tin lined with baking paper
- Bake in oven for 20 mins - it won't look that different when you get it out of the oven but it is cooked!
- leave to cool in tin
- meanwhile make the icing - just mix it all together.
- Ice the cooled slice and sprinkle with a little bit more of the desicated coconut.

Slice it up!

PS If you slice it up nice and small as seen in above photo you can eat more pieces with less guilt. Crazy I know.

Tuesday, February 12, 2008

Whites Blondies Brownies


Here's the recipe for the baby poo cakes Whities. My recipe writing style is quite conversational so pardon the comments thrown in here and there. Oh and I can't take the credit for this, it was torn out of one of those trashy supermarket food mags - I just can't tell you which one cause the page I tore out doesn't have the footer stamp on it. But then again Nigella has almost the same recipe in the Domestic Goddess I think. So it seems to me that recipe land is kinda like craft land - you know people change one tiny element of a pattern/recipe and then claim it as their own (and then bag on someone else for copying them - the nerve, the craziness).

White Chocolate and Almond Blondies

  • 75g unsalted butter, chopped
  • 375g white chocolate buttons (this is the size bag I buy but it doesn’t matter if the bag is a bit bigger or smaller)
  • 3 eggs
  • 90g caster sugar (I use my jar that has a vanilla bean shoved in it)
  • 2 tsp vanilla extract
  • 1 1/3 cups SR flour
  • 100g slivered almonds (again if the bag you buy is bigger or smaller don’t sweat it)
  • Icing sugar for dusting
Preheat oven to 175 deg C
Line a 20cm x 30cm lamington pan with baking paper.
Melt the butter and 300g of the white choc in the microwave or if you’re a Martha Stewart purist do it over a saucepan of simmering water.
Whisk the eggs, caster sugar and vanilla extract in a bowl.
Stir in melted choc/butter mixture, then fold in the flour.
Stir in the remaining chocolate buttons and almonds.
Scrape the mixture into the prepared pan and spread it to the edges.
Lick the bowl now cause it's bloody delicious!
Feel sick cause you ate too much raw brownie mixture.
Fill the empty mixture bowl with hot water so you can't be tempted to eat anymore raw mixture.
Bake in the oven for about 25 – 40 mins. The time depends on how goo-ey you like your brownies. I bake mine a bit longer cause I like the middle pieces to be not too gooey that they’re impossible to pick up. Just make sure the top has a firm crust.
Cool in the pan, then cut into squares. Dust with icing sugar (if you want).
YUM!

Thursday, November 15, 2007

KISS

That is Keep It Simple Stupid, don't you just love/hate that old high school teacher saying? Anyway my life as a new mother is reduced to KISS on a daily basis. I do anything I can to make things simpler or quicker. So (for now anyway) long gone are the indulgent long lingering evenings creating yummy concoctions in the kitchen and in their place are quick and simple creations scraped together in between feeds. But I didn't ask the deliciousness to move out oh no, just try this on for size.

Tuna Cheese Melt (inspired by my favourite cafe lunch at Palamino)

Mix together a small can of tuna, some capers, half a chopped shallot (the french ones), some lemon juice, salt, pepper, parsley and whole egg mayo.


Toast some yummy sourdough or ciabatta on one side and then spread the other side with your favourite relish or chutney


Then spread the tuna mix over the chutney and top with grated cheese. Whack it under the grill again and Bob's your Uncle.

Sunday, January 14, 2007

100 Posts and Project #3: Relish (complete with recipe)

Yay, Finally I hit the 100 post mark. Congratulations me. The 100th post feels no different to the 99th post or I suppose the 101st- just like having another birthday really.

I thought about doing something to mark the momentous occasion but instead I think I will just get to work on my 16 (yes yikes 16) little gifts for the Melbourne blog meet up. I'm totally intimidated by the whole thing - well no actually I'm really looking forward to meeting everyone, but I'm totally freakin about crafting for all these crafty super stars. Onto less intimdating things...

Project # 3: Sadie's Tomato Relish
(I'm including my baking/cooking in the project count - I think it counts as part of the miscellaneous part of my craft related adventures)


This relish is the old school kind. You should make it, it's easy and yum. And for all you jar sterilising chickens - you know who you are (and so do I cause you commented about your fears on my lemon butter post!) - dive in and have a go, it's that easy.

4 pounds tomatoes (1.8kg) (yep that's how old skool it is the recipe has imperial measurements, but I've got rough conversions).

Skin and dice the tomatoes - to skin make a cross with a knife through the skin on the base of each tomato and soak in boiling water for 3 mins - the skins come off easy then.

2 pounds (900gms) brown onions. Slice 'em thin (works extra good if you use your newly very sharp knife sharpened with your Furi diamond fingers knife sharpening set you got for christmas)


Mix the chopped tomatoes and sliced onions with a handful of salt (approx 30gms). Leave to stand overnight.

Drain the juices off the tomato and onion mix and squeeze to get all the excess out.

Add 1.5 pounds of white sugar (700gm) and 1 pint (450 ml) of malt vinegar to the tomato and onion mix.


Bring to the boil and boil for about 5 minutes or until soft.


If you want a chunkier tomato relish, just boil for 5 mins. If you want a mushier one, boil for a bit longer. At this point I also added 4 cloves of garlic thinly sliced (but Grandma doesn't do that in hers)

While that's boiling, in a separate bowl whisk together 2 tblsp plain flour, 1 Tblsp of curry powder, 1 Tblsp mustard powder and 1/2 tsp of cayenne pepper with 1/2 pint of malt vinegar.


Add to the tomato mix and stir in well. Cook 30 - 40 minutes till it thickens. Keep stirring it every now and then (maybe after 2 or 4 rows of knitting) to make sure it doesn't stick to the bottom.

While it's boiling, steralise your jars. Preheat the oven to 110 deg C. Put your clean jars:


into a big saucepan along with the metal lids for the jars. Cover with cold water. Bring to the boil and boil for 10 mins. Now put the lids and upside down jars on a baking tray lined with a teatowel and put them in the oven till their dry. (I also sometimes just bung the wet jars straight on the racks in the oven..I spose that's the lazy way?). I also had a cheats way that I used when I first conquered my jar sterlising fear last year. But really how much simpler can you get than boiling and putting in the oven - you don't even have to wash the pot up - it's just boiling water and glass afterall.

Now put the hot relish into hot jars. That's it, that's all. Yum yum. Great on sandwhiches and with corn fritters. Thanks for sharing the recipe Grandma, hope you don't mind me sharing it here?

Now if you've got this far through this post (congrats to you and thanks for indulging me) and you'd like to have a little taste test, I have a spare jar which I will send to you through the post (only in Australia though - cost me a small fortune in postage otherwise). Leave a comment and make your claim. I did a chilli jam for pesto swap last year with Bel and it works fine sending jars through Aus Post.

Actually Bel if you're reading this - I still owe you for the Amy Butler pattern, so look out in your letter box for a jar of the relish!

Saturday, April 29, 2006

Chilli Jam II

We had a BBQ tonight - why I don't know as it is now almost winter - and as I forced a chillijam taste testing, compulsorary chillijam condiment consumption and even a takeaway jar on our very obliging guests I was reminded that I made a chilli jam related promise.

You need some chillis (dah)


Two kilos or so of capsicums (red makes the jam redder) throw them on a baking tray and bake in the oven for a while till the skins blister


A while before the capsicums are looking cooked, add in a kilo or so of tomatoes (nothing in this hardly-a-recipe is precise) on a tray and roast them in the oven too.

Then put the capsicums and the tomatoes in a bag to sweat them and help make the skins easy t0 get off (not nice getting skin in your teeth while eating delicious chilli jam)


While the capsicums and tomatoes were roasting you will have cut up a bunch of chillis - take the seeds out of most of them (I will update later with a recommended number of chillis but it really depends on taste - and the chillis!), chop up a couple of brown onions and a few garlic cloves and fry it up in some olive oil - a decent amount


Then add the chopped skinless capsicums and tomatoes, some brown (or dark brown) sugar and some red wine vinegar. Mix it all up good and then wizz it with a stick blender to make it as smooth (or chunky) as you like. At this point you can add some lemon juice to help it all set.

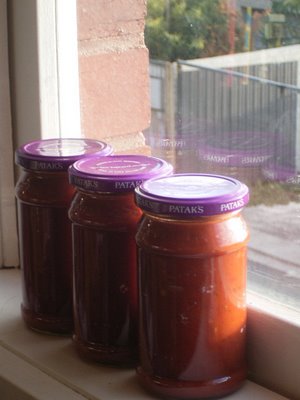
Then cook it for a while - two hours or more depending on how thick you like it (I like it to cook for a while) and then while it's still steaming hot ladle it into some sterilised jars.

Finally, display the three best looking jars on your window sill in a vain and futile attempt to get a decent photo for your blog even though you know zero about photography (although you will now know how yummy chilli jam tastes).


Especially good with very fresh bread and cream cheese....yum.